
Orbewa Egg Locations and Turn-In Checklist
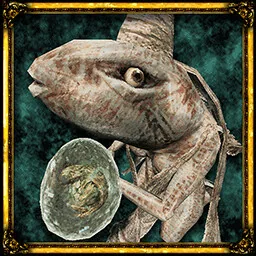
Find all 50 Orbewa Eggs by landmark, then return them to Erma near the Obmuer Temple Wing Altar for Sacred Waters.
Bring all 50 Orbewa Eggs to Erma, Matron of the Deep. After Dagoom, ride the large elevator out of Obmuer Temple and take the left cave from the platform above the circular floor opening. If you have the Obmuer Wing Altar, travel there and walk north to her cave. Sacred Waters confirms the final delivery.
Updated
Sources checked
On this page
Return eggs to Erma and check your progress
Pick up items labelled Orbewa Egg as you explore. Speak to Erma to turn them in. The delivered eggs appear behind her and she provides food at certain milestones. Use the eggs in the cave and your Sacred Waters progress, where shown in Challenges or on Steam, to tell how many you have delivered.
Bring the Cestus for higher ledges and return with more Wind Gems for longer crossings. The Egg Charm becomes available at Umbada’s after the Ancient Stone Duck hand-in. It helps reveal eggs while you wear the Mask of Second Sight.
This checklist groups the egg in the cave opposite the raider ship with the Underworld. The ledges beneath the main Tower-to-Mausoleum bridge are split by the approach you take.
Isle of Neasied
Scroll sideways for more columns. Use the arrow keys when the table is focused.
| Pickup landmark | How to reach it |
|---|---|
| Broken bridge at Cemetery Precipice | From the monument, look down toward the broken bridge on the Tower side. Dash out to the lower bridge segment. Return once you have the extra dashes from Obmuer if the jump is still too long. |
| Below the crypt | At the cemetery crypt with the floor hatch, go around the left side of the structure and drop to the ground beneath the cliff edge. |
| Islet beyond the Star Lizard | Return to the cliff where the Moss Golem dropped the Golem Arm Crusher. With all five Wind Gems, dash to the first islet with the Star Lizard and then to the next islet with the chimney. The egg is on that second islet. |
Obmuer Temple
Scroll sideways for more columns. Use the arrow keys when the table is focused.
| Pickup landmark | How to reach it |
|---|---|
| Round window above Sacred Cistern | Cross to the circular window opposite the main route past the Cistern. Turn left and back from the window, then dash onto the ledge to pick up the egg. |
| Hollow across from the Prison Corridor stairs | Pass the long corridor by the Prison Corridor monument. From the chest below the stairs, dash across to the recess in the rock wall. |
| Rock across from the Wing Altar building | Climb the stairs left of the Wing Altar to the roof and use the Cestus to reach the raised tiara pedestal. Follow the building’s projecting stones, then jump to the rock opposite. |
| Top of the tower opposite the roof | From the same roof and tiara route, take the projecting stones onto the rock on the other side. Uppercut with the Cestus and dash to the top of the tower across the gap. |
| Far rock beyond the last tiara | Follow the rooftop island chain past the chest to the islet with the fourth Ceremonial Stone Tiara. At its far end, use the Cestus uppercut and air-dash to the rock across from it. |
Tower of Knowledge
Scroll sideways for more columns. Use the arrow keys when the table is focused.
| Pickup landmark | How to reach it |
|---|---|
| Behind the Foyer bookcases | Defeat the Skeletal Executioner to reach the Foyer monument. Check behind the shelving to its left and clear the skeletons guarding the floor-level pickup. |
| On top of a bookshelf by the spiral stairs | Above the Foyer, take the spiral stairs between the second and third floors. Jump from the staircase to the top of the shelves opposite. |
| Outer-wall ledge below the window | From the window route above the lobby, drop to the larger left platform and pull its lever. Face southeast from its edge and dash to the lower jutting rock. That ledge leads back around to the entrance. |
| Below the ramp on the outside of the roof | After the Necronomicon, use acid-enhanced Throwing Daggers to clear the growth covering the top-floor route. Go outside through the newly reachable upper door, round the wall and search below the slope. |
| Room behind the Archives flesh | After getting the Acid Vial, clear the faces near the balcony stairs and through the other Forbidden Archives door near the Storm Gem. Enter the room the growth previously blocked. |
| Under stairs above the Foyer | Clear the large flesh growth over the stairway near the Foyer. Revisit the opening below the exposed flight and collect the egg beneath it. |
| Below the exit toward the Mausoleum | Clear the growth by Budaen’s room so the passage toward the Mausoleum opens. At the exit, look down on the left before crossing and drop to the egg ledge. |
Deimpo Mausoleum
Scroll sideways for more columns. Use the arrow keys when the table is focused.
| Pickup landmark | How to reach it |
|---|---|
| Crate on a roof below the bridge | Head from the Tower toward the Mausoleum. Drop to the lower roof on the right of the bridge and break the wooden crate to reveal the egg. |
| Pit beyond the round enclosure | From the bridge, drop into the stone ring on the left. Continue down through the mechanism gate, go straight at the fork and descend into the pit to the egg ledge. |
| Behind two walls before Crumbling Stairwell | At the lower end of the stair descent, after the first Giant Spider and before the monument, examine the wall near the last steps. Open it, then open the second hidden wall farther inside. |
| Across the fourth Wind Gem shrine | Climb the moving columns in the red-water chamber to the Wind Gem. Take it for four dashes and use them to reach the glowing pickup on the far ledge. |
| Stained-glass ledge at Puwema’s Rest Room | At Peha’s Crystal Monument, take the stairs above the coffin room. Air-dash from the upper landing to the ledge near the stained glass. |
| Cliff below the lever bridge | From Puwema’s Rest, reach the candlelit bridge across the pit and follow it to the lever. Take the nearby tunnel and dash across to the ledge below. Dropping farther takes you back to the dark caves. |
| Thin wall ledge in the sarcophagus chamber | In the chamber below the Metallic Pus Bag, start near the coffin with two blue torches and look up to the south. Dash to the thin ledge running around the wall, then follow it around to the egg above the far end. |
| Above Gagi’s kitchen | At Chef Gagi’s kitchen, use the Cestus uppercut to reach the upper ledge in the kitchen area. This is a separate pickup from the coffin room’s thin-ledge crossing. |
Ancient World
Scroll sideways for more columns. Use the arrow keys when the table is focused.
| Pickup landmark | How to reach it |
|---|---|
| High platform past the flooded vents | Past the flooded room on the route from the Ventilation Shaft monument, continue toward the next large shaft. In the high chamber before the drop with the seated skeleton, jump from the raised platform across to the other side. |
| Wreckage opposite the Overlook monument | From the outdoor monument reached after the shafts, go up the slope across from it. Climb the debris with the Cestus, above the ledge with the Aureate Ratty Bug and toward the fish-men. |
| Far side of the large horizontal pipe | Take the high route through the island with the Plasma Spear building. Find the large rock and pipe across your path. Climb the boxes to the left, then uppercut over the pipe and collect the egg before dropping down. |
| Roof above the castle gate plaza | On the approach near the island before Ossi’s Lab, follow the higher path toward the Deep Star Lizard. Look down to the north for the building roof directly above the sealed castle-gate plaza. |
| Path behind the final power station | From the Scrap Yard Crystal Monument, climb the ramp toward the last power station. Take its left-side path around to the southwest behind the building and collect the egg beyond the enemies. |
Siraatsu Castle
Scroll sideways for more columns. Use the arrow keys when the table is focused.
| Pickup landmark | How to reach it |
|---|---|
| Between pipes above the left foyer route | From the ground-floor foyer, take the left side and descend into the machinery section beyond the forks. Reach the lift, ride up and check between the two upright pipes. |
| Cup-marked room by the dining hall | At the bar with the Seal Breaker of Swords chest behind it, take the corner room marked with the Cup seal. Check inside for the egg. |
| Side passage past Halls of Disrepair | From the Halls of Disrepair monument, continue two rooms along the castle route, then take the passage on the right. |
Verdant Hollow
Scroll sideways for more columns. Use the arrow keys when the table is focused.
| Pickup landmark | How to reach it |
|---|---|
| Cliff cave near the entrance well | Drop down the well from the Neasied route. When you reach Verdant Hollow, dash into the opening in the cliff face and check the cave. |
| Distant window past the cave | From Cliff Edge, go to the dark cave leading past the Jade Teardrop Charm room. Exit the cave, turn left and dash across to the far window. |
| Platform below the broken bridge | Walk from Cliff Edge toward the broken span. Look below and to the right, then drop to the projecting platform. |
| Tree opposite the wrecked span | From the broken stonework near the Wing Altar, jump out to the tree across from it. Check the tree separately from the stone ledge beneath the bridge. |
| Inside the cave beyond the lake | From the broken bridge by the Lake Side route, use the branch and follow it around the trunk to the cave opening. Cross the water past the Golden Crab area and head deeper into the cave. |
| Passage below the tiara puzzle | Use the four Ceremonial Stone Tiaras at the fish-man statue puzzle. Drop through its opened pit, then follow the path straight past the room with the food and its left-hand hidden wall. |
Forgotten Dungeon
Scroll sideways for more columns. Use the arrow keys when the table is focused.
| Pickup landmark | How to reach it |
|---|---|
| Locked cell outside Husipo’s room | Beat Black Skeletal Witch Husipo and collect the Tarnished Cell Key. Leave the arena and open the cell on the left. |
| Secret wall in the dark cave | On the prison approach, dash across the gap toward the dark cave and follow its uphill slope. Interact with the wall at the bend. |
| First cell past the arch | At the large brazier, take the right branch past the orange seal cell and through the arch. The egg is in the first cell on the right. |
Underworld
Scroll sideways for more columns. Use the arrow keys when the table is focused.
| Pickup landmark | How to reach it |
|---|---|
| Secret wall opposite the statue | From the red grotto monument, cross to the cave, emerge high beside the torch and dash to the brick structure. Take its lift to the top, continue to the statue room and open the wall facing the statue. |
| Wall by the Jade Teardrop Charm chest | In the underground route from the prison approach, turn right at the large brazier. Find the Jade Teardrop Charm chest, then open the wall ahead and to its right. |
| Hidden passage opposite three skeletons | Enter the cave across from the grounded raider ship in the Obmuer ruins. At the crossroads, follow the left branch and open the wall opposite the three skeletons. |
Rotting Cavern
Scroll sideways for more columns. Use the arrow keys when the table is focused.
| Pickup landmark | How to reach it |
|---|---|
| Behind the wall at the decaying tree | Drop through the giant hollow tree to the first cavern monument. Open the concealed wall in the rock to its left. |
| Rock recess above the rotten lake | When the lake first comes into view, descend the branches on the cliff and dash into the hollow in the wall opposite. |
| Stone bridge beyond the temple cave | From the temple entrance, go through to the cave mouth and find the shell beside the Star Lizard’s route. Jump diagonally right onto the stone bridge above the route to the next monument. |
| Platform behind the rock wall | From the Crumbling Fortress monument, take the right-hand fork. Go up the ramp and turn left at the top, then air-dash back over the path you came in on to the landing behind the rock wall. |
Record of Sin
Scroll sideways for more columns. Use the arrow keys when the table is focused.
| Pickup landmark | How to reach it |
|---|---|
| Rock groove across from the cliff-edge chest | From the Wing Altar, take the cave branch on the right to the chest at the cliff edge. Look ahead and right of the chest and dash into the recess in the rock wall. |
Petrified Garden
Scroll sideways for more columns. Use the arrow keys when the table is focused.
| Pickup landmark | How to reach it |
|---|---|
| Outside the Stone Hut | Step off a Wing Altar mid-teleport to enter the garden. At the Stone Hut Crystal Monument, walk out of the hut and check just outside it. You can collect this on your first visit. |
Return after the last delivery
Show spoiler details
After handing in the final egg and earning Sacred Waters, leave the area, rest elsewhere and return. The Treacherous Sea Prince appears in place of Erma. Defeat it, then use the Memento Mirror there to collect Erma’s Memento if you are working on the altar.
Sources
- Sdaknight, full collection route and 50 egg pickups
- Robert N Adams, Erma’s cave and Obmuer return route
- Robert N Adams, Mausoleum egg routes
- Robert N Adams, Tower egg routes and Erma’s delivery display
- Drewski, Tower and Mausoleum return notes
- SquidRadio, Tower flesh clear and egg pickups
- Players’ egg tracking and Egg Charm observations
- Output Lag, final delivery and Erma’s Memento
- Freshly Baked Games, Sacred Waters achievement