
Ancient World Power Towers: Pyramid Electricity Puzzles
Reach each blue pyramid, match its linked nodes to the correct shots, and shut down all three towers to open the castle route.
Open the three blue pyramids with the Cobalt Blue Seal Breaker. Use the Shock Rifle to light every connected node in each top control room at once. Where a terminal offers Emergency Shut Down, you can spend 15 Ancient Coins to clear that tower instead. The castle gate opens after all three pyramids go dark.
Updated
Sources checked
On this page
Get the Shock Rifle and Cobalt Blue Seal Breaker
Get the Orange Ocre Seal Breaker from Ossi. In the Ancient World teleporter loop, exit the white room with a skeleton and three metal boxes. Take the cave on the left, climb to its upper exit, then turn left and dash across the broken catwalk. Use Orange Ocre on the circular platform in the building to ride down into the lab.
Take the Shock Rifle from the chest. Use it to light the small circuit above the nearby door, then take the lifts to the top catwalk. Face northeast and dash to the Cobalt Blue Seal Breaker. The small lab circuit opens this route. The three tall pyramids each have their own control room.
Find each tower’s top control room
Scroll sideways for more columns. Use the arrow keys when the table is focused.
| Tower | Reach the control room |
|---|---|
| Near Ossi and the locked castle gate · 19 nodes | From Ossi’s Lab, head northeast to the first square building on the right and ride the lift down. Outside, follow the cable and paved path south to the blue-lined pyramid. Circle to the blue lock at the rear. Inside, climb the narrow cable and curved pipe, dash via the red-lit platform to the vine-hung exit, then ascend the exterior pipe. Re-enter higher up and use the circular lift above the curved cable. |
| Across the wide gap · 13 nodes | From the castle-gate plaza, take the north path on the west side of the canyon. Go up the steps guarded by a Mecha Knight, use Orange Ocre on the door, and take the lift to the next orange door. Pick up the fifth Wind Gem at the shrine through the cracked wall, beyond two Ghost Manticores. Back outside, look east to cross the gap. Follow the ramp around the tower to its blue lock. Inside, use the boxes to reach the pipe and dash from the pipe to the round lift. |
| Above the three-box teleporter, on the rifle-lab side · 10 nodes | Leave the white teleporter room and climb through its cave to the upper exit. Dash to the plateau ahead, then southeast across the gaps to the Crystal Monument. Follow the ramp up toward the tower and circle around to the blue door. Defeat the Ancient Besom Cutter to activate the lift, then take the next circular lift into the control room. |
Shoot the marked nodes from the starting state
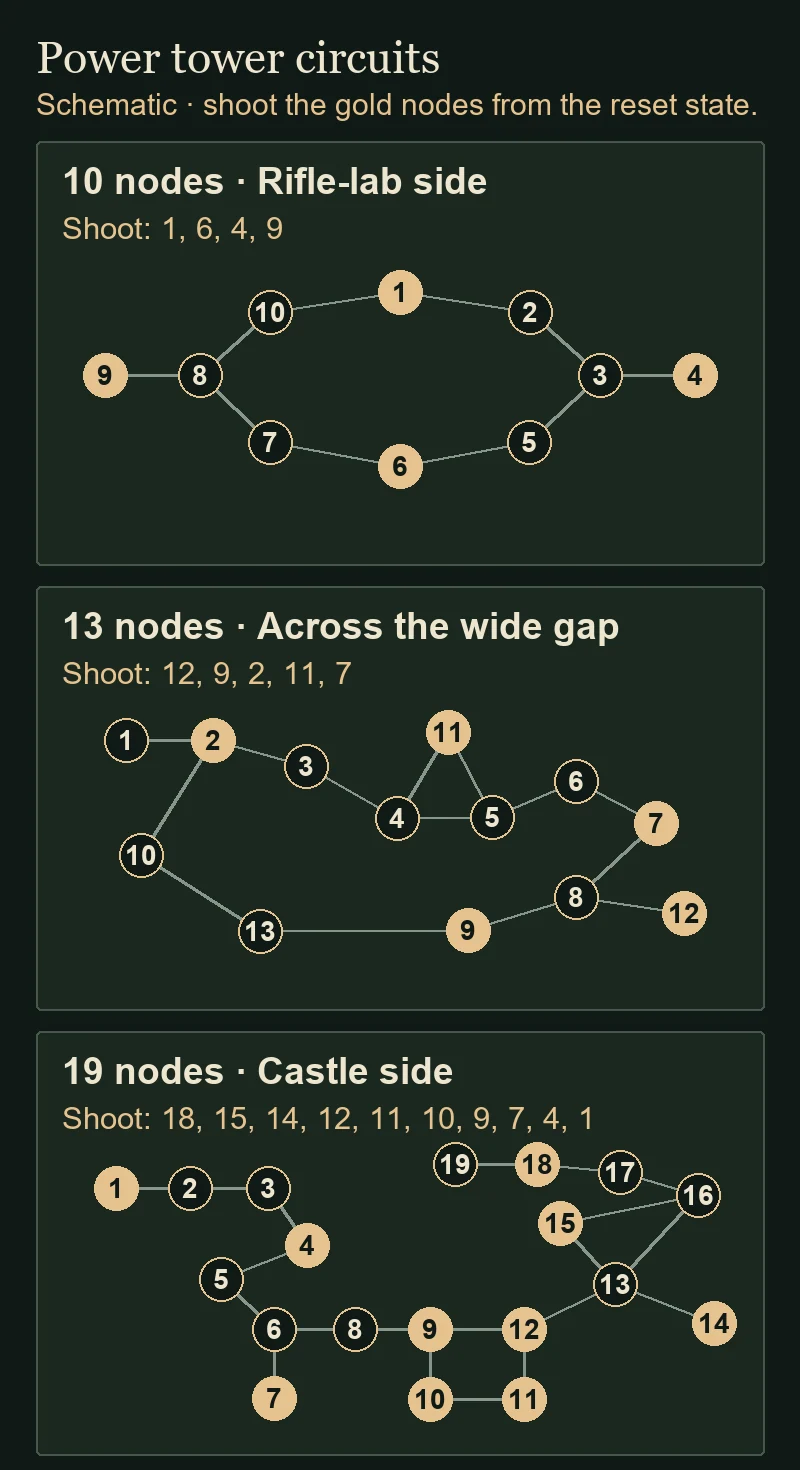
A Shock Rifle shot flips the node you hit and each node directly connected by a wire. A second flip turns a lit node off. Identify your room by the node count and cable layout before shooting. The numbers below are position labels for the diagrams, so use the cables to locate each target.
Use these recipes from the unpowered starting state. In each cable description, consecutive numbers are neighbors. Extra connections are listed separately so you can follow the layout without guessing from the order in which you visited the towers.
Scroll sideways for more columns. Use the arrow keys when the table is focused.
| Layout | How to identify the nodes | Shoot once each |
|---|---|---|
| 10 · rifle-lab side | Find the loop starting at the north node. Trace 1–2–3–5–6–7–8–10 back to 1. The two single branches connect 3 to 4 and 8 to 9. | 1, 6, 4, 9 |
| 13 · across the gap | Count 1 through 9 along the main run from its north end. The long return goes 2–10–13–9. Node 11 joins both 4 and 5, and 12 hangs off 8. | 12, 9, 2, 11, 7 |
| 19 · castle side | Start at the long end that bends at 3. Follow 1–2–3–4–5–6–8–9–12–13–15–16–17–18–19. Node 7 branches from 6. The side run joins 9–10–11–12. Node 14 hangs from 13, which also connects directly to 16 at the north side. | 18, 15, 14, 12, 11, 10, 9, 7, 4, 1 |
Recover a changed board and verify the shutdown
Check the terminal options on your build. If you see Reset Generator Node Network, use it before applying a starting-state recipe to a board you already changed. Refill Energy Cells recharges the rifle. Initiate Emergency Shut Down costs 15 Ancient Coins per tower when offered. One Switch 2 player reported on November 14 that their copy lacked the paid bypass.
If your build lacks the terminal options, pause between shots to recharge. To undo a known shot, hit the same node again. If you have logged every shot, repeat them to restore the board. A save from before that attempt is another way back to the starting state if you can reload it. Resting or warping away can leave the board as it was.
Check the tower from outside after each shutdown. Its exterior blue glow goes out, and the lights over the gate near Ossi track the three generators. If the gate remains sealed, look for the pyramid that still glows. When all three shut down, go through the gate toward Siraatsu Castle.